
Because I could no get a stable WiFridge (see here, here and here for details on my first version of WiFridge) using RN-XV Wifly module, I decided to give a try to the new Adafruit CC3000 Wifi shield.
By the way, I made a mistake when I ordered the shield (although it is quite clear on Adafruit’s web site…) there are 2 versions :
- one with uFL connector and then needing an additionnal antenna and adapter wire
- one with built-in ceramic antenna
So unless you really need an external antenna, the ceramic antenna should be sufficient for most use…
Apart from Wifi module, hardware is quite similar :
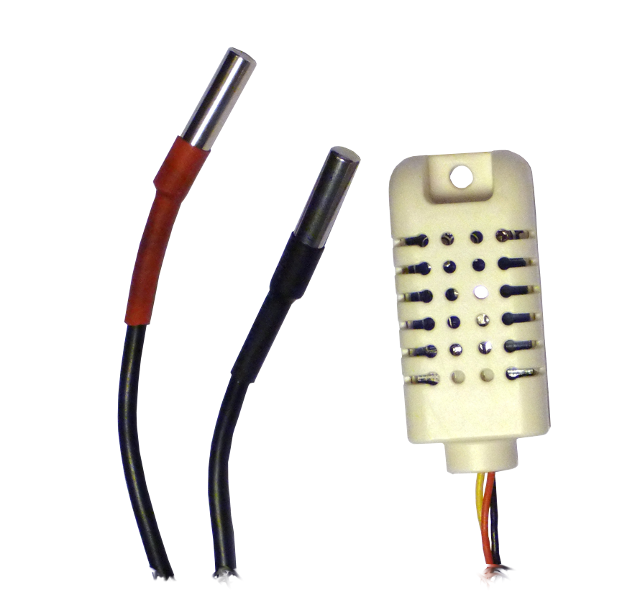
- 2 waterproof DS18B20 temperature sensors
- 1 AM2302 sensor
- 3 3mm LEDs (green, yellow, red)
- 3 1kΩ resistor
- 1 10kΩ resistor
1 4.7Ω resistor(AM2302 does NOT need a pullup… it is built-in !)1 Arduino Wireless shield1 RN-XV Wifly module- Adafruit CC3000 Wifi shield
- a bunch of wires
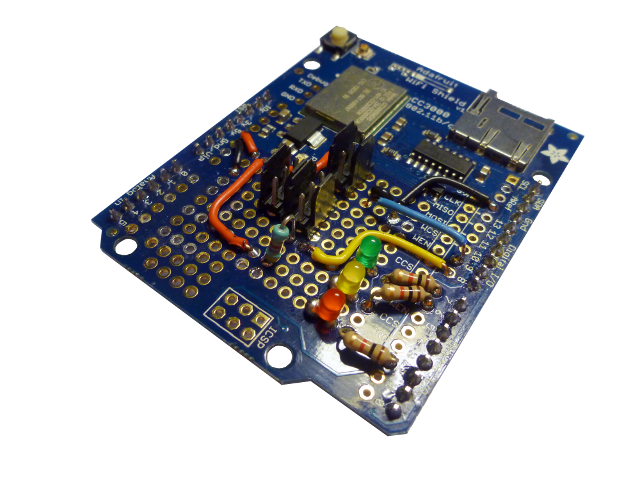
Connections are quite straightforward :
- Led are connected to digital I/Os 3, 6 and 7 through 1kΩ resistors. They are used for operation status.
- Both DS18B20 are conected to port 8 (yellow wire) and make use of a 4.7kΩ pullup resistor
- AM2302 is conneted to port 9… no pullup required !
Code for arduino is here.
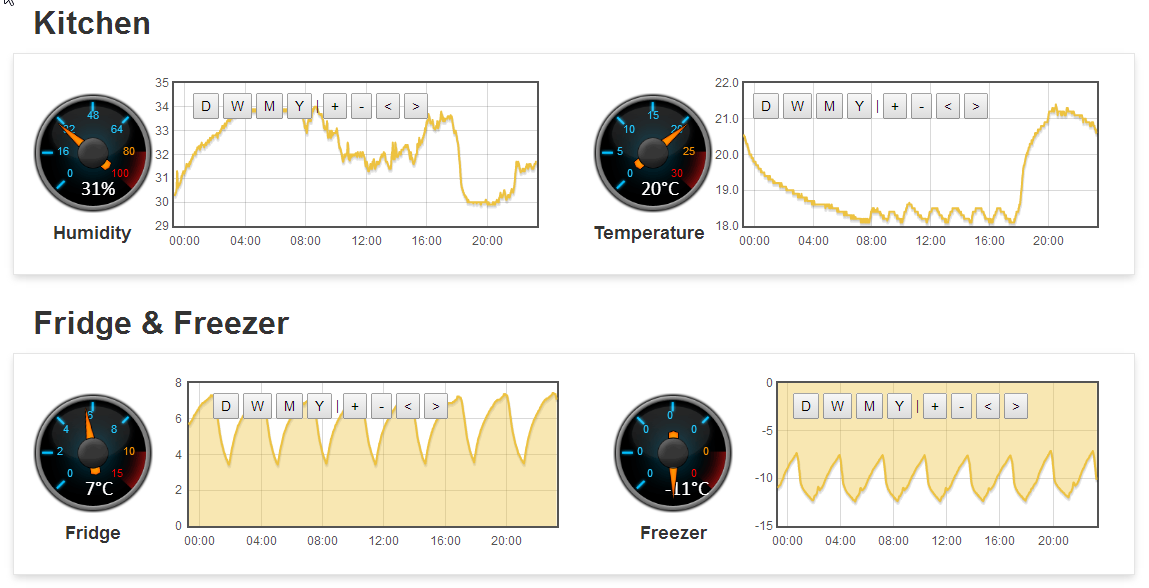
It has now been running for 1 day with no glitch… and it will hopefully continue !
Hi,
I’ve spent 3 months trying to get the wifly working with emoncms. drops the link and won’t reboot correctly. Your experience is similar to my own. Just wondering if you ever tried an AT-MEGA instead of the uno? and also, how is the Adafruit shield working for you? Thanks for the blog. Eamonn
Hello Eamonn,
I never tried the AT-MEGA but I guess the problem is coming from the WiFly, not the microcontroller. Its “command mode” vs “data mode” gets tricky to use and it seems to just hang from time to time, getting stuck in command mode. Rebooting the arduino or the wifly is not always working. Only an electrical shutdown would allow it to work again 🙁
So far, my experience with the CC3000 is great. Easier to use and seems more stable. At least, when you “soft” reboot the arduino, it is sufficient to get it working again. I Actually added a watchdog because CC3000 would (rarely) hang on sending a request. But after watchdog timer triggers, arduino is rebooting and everyting is back up and running. So no downtime really.
That being said, It has now been working for almost 3 weeks without a reboot (even a soft one).
I am glad you find the blog helpfull 🙂
JS
First of all I want to congratulate for your blog. I am using a CC3000 based module and I want to publish my measures in emoncms.
I have achieved with an Arduino Ethernet but I am not familiar with the CC3000 and with WiFi with Arduino. I had very bad experiences with Arduino Wifi Shield (expensive and I couldn’t achieve nothing usefull with it).
I have been reading your code and you don’t set up nothing of the WiFi net (SSID, pass, etc.) because you use the smartconfig. Can you explain more about it? Thanks
Hello Javier,
SmartConfig is a feature of CC3000 chip. It allows to configure the Wifi network once for all and not to have the SSID and encryption key in the sketch. You have to dowload a specific sketch tonto the Arduino and then use a smartphone or a tablet to configure the CC3000. Once this is done, you can safely reprogram the Arduino and the CC3000 will keep its configuration.
You will find more info on Adafruit’s tutorial here : https://learn.adafruit.com/adafruit-cc3000-wifi/smartconfigtest
I will add a comment to my code so people know where to look if they need tmore info on SmartConfig.
Hope this will help.
Thank you for your comment. I am always happy when I know a post was helpfull 🙂
JS
Pingback: From WiFridge to WeIOFridge | Interacting Objects
Hi, great blog!
Just a question: Did you put everything inside the fridge or just the temperature sensors?
Hello Lucas,
The answer to you question is… just the sensors and for several reasons :
– I am not sure such electronic boards will operate at low temperature
– I either power it thru battery, but in this case, battery efficiency would be severly impaired, or use power line but I then need a cable to go out of the fridge !
– as I am monitoring both my fridge and my freezer, I would need at least one cable between the two
– Wifi may not be very reliable from inside the fridge
So… I decided to have the board outside and only have the sensors inside.
I’ll may drill some hole in the door joint and fill it with silicon seal to avoid cold loss though. For now, I just passed both cable between the joint and the fridge.
Thanks for your comment, it is always appreciated 🙂
JS