From WiFridge to WeIOFridge

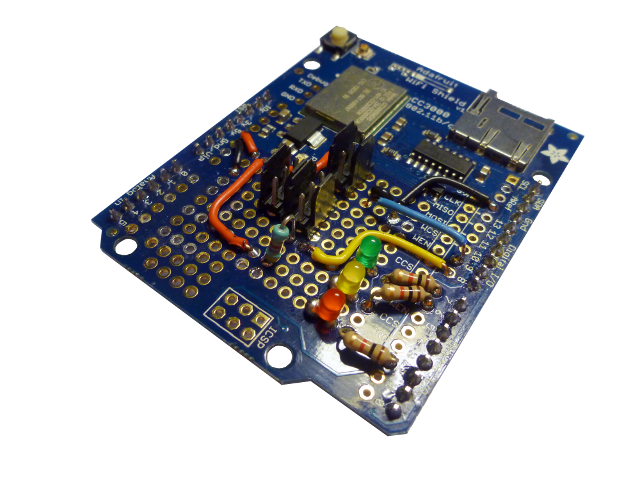
Now that I have my WeIO, I thought I could try to “migrate” my WiFridge (which already worked on an Arduino UNO + WiFly board and an Arduino UNO + Adafruit’s CC3000 shield)

I tried to use a WiDo from DFRobots but it it based on an Arduino Leonardo and the bootloader being larger than for an Adruino Uno, I can’t get my program to fit in memory ! I’ll try a bit later to either get my code lighter or remove the bootloader and program the chip directly.

So for now, I’ll just try to leverage WeIO power to get a new version of my WiFridge : the WeIOFridge !

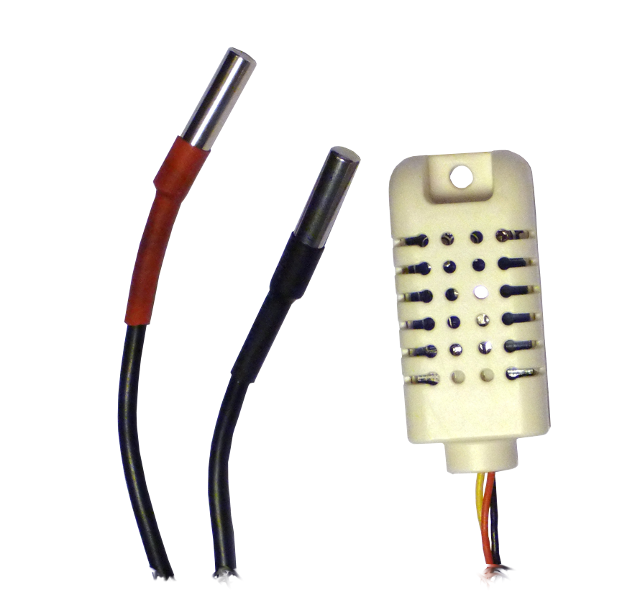
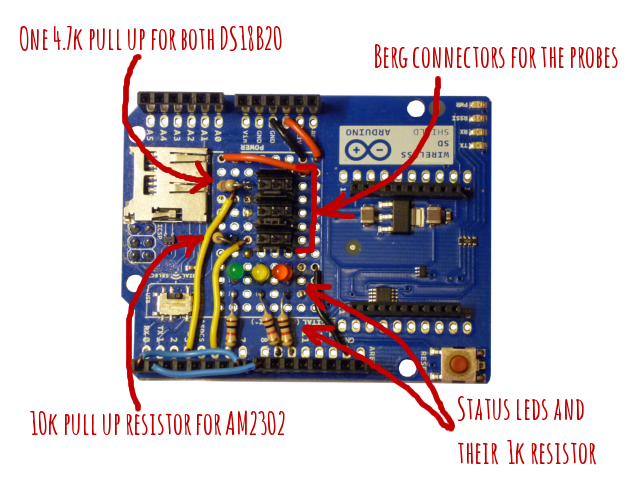
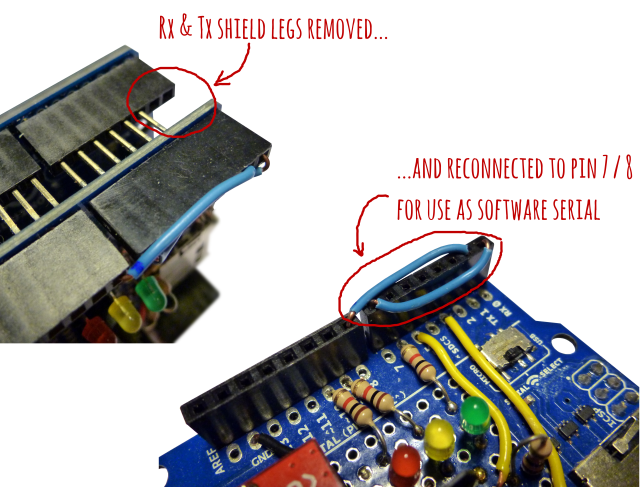
I had first to connect 2 DS18B20 which are going into the fridge and freezer. But there is no direct support for it so I used a workaround described here : use the UART to “simulate” 1-wire protocol. At the time of writing, a new version of WeIO software should be out in a few days which is including all necessary librairies and a little helper to simplify the use of DS18B20 on UART port.

Then, I tried to connect a DHT22 for kitchen temperature and humidity… and got some troubles. But thanks to the help of WeIO team (see posts here and here), we finally managed to get it working. As for DS18B20, update for this will be included in next WeIO software which should be out soon.

And after a bit of coding

  • in Python for the server side : reading data from the sensors, and sending them to a private emoncms web site and any connected Web client
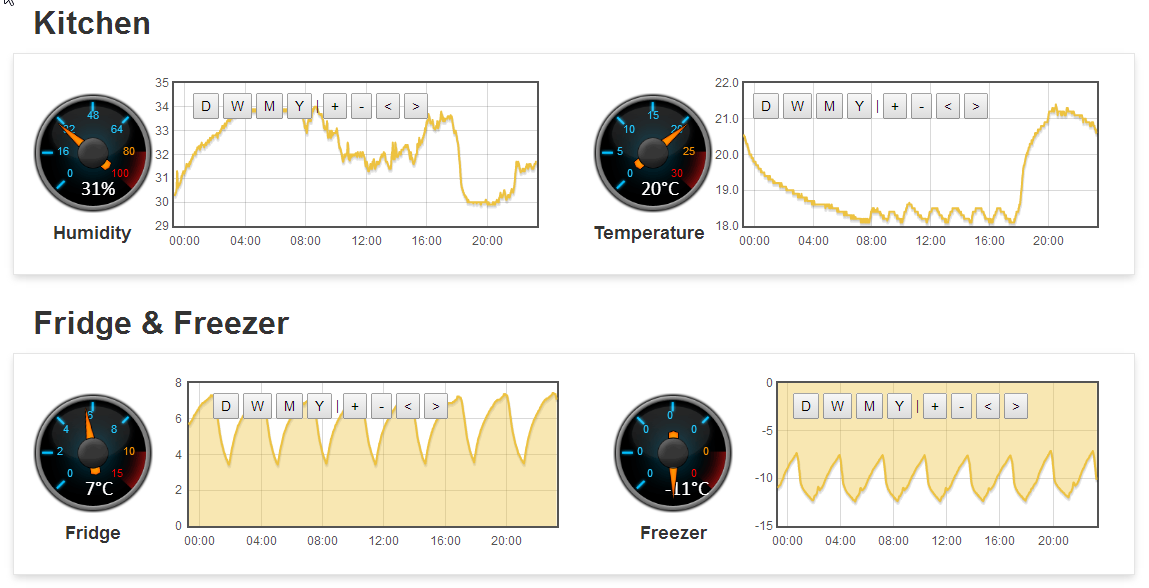
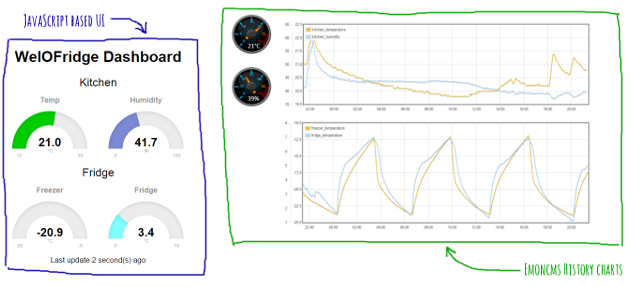
  • in JavaScript for a nice Web UI displaying instantaneous data

I now have this :

WeIOFridge UI & Emoncms

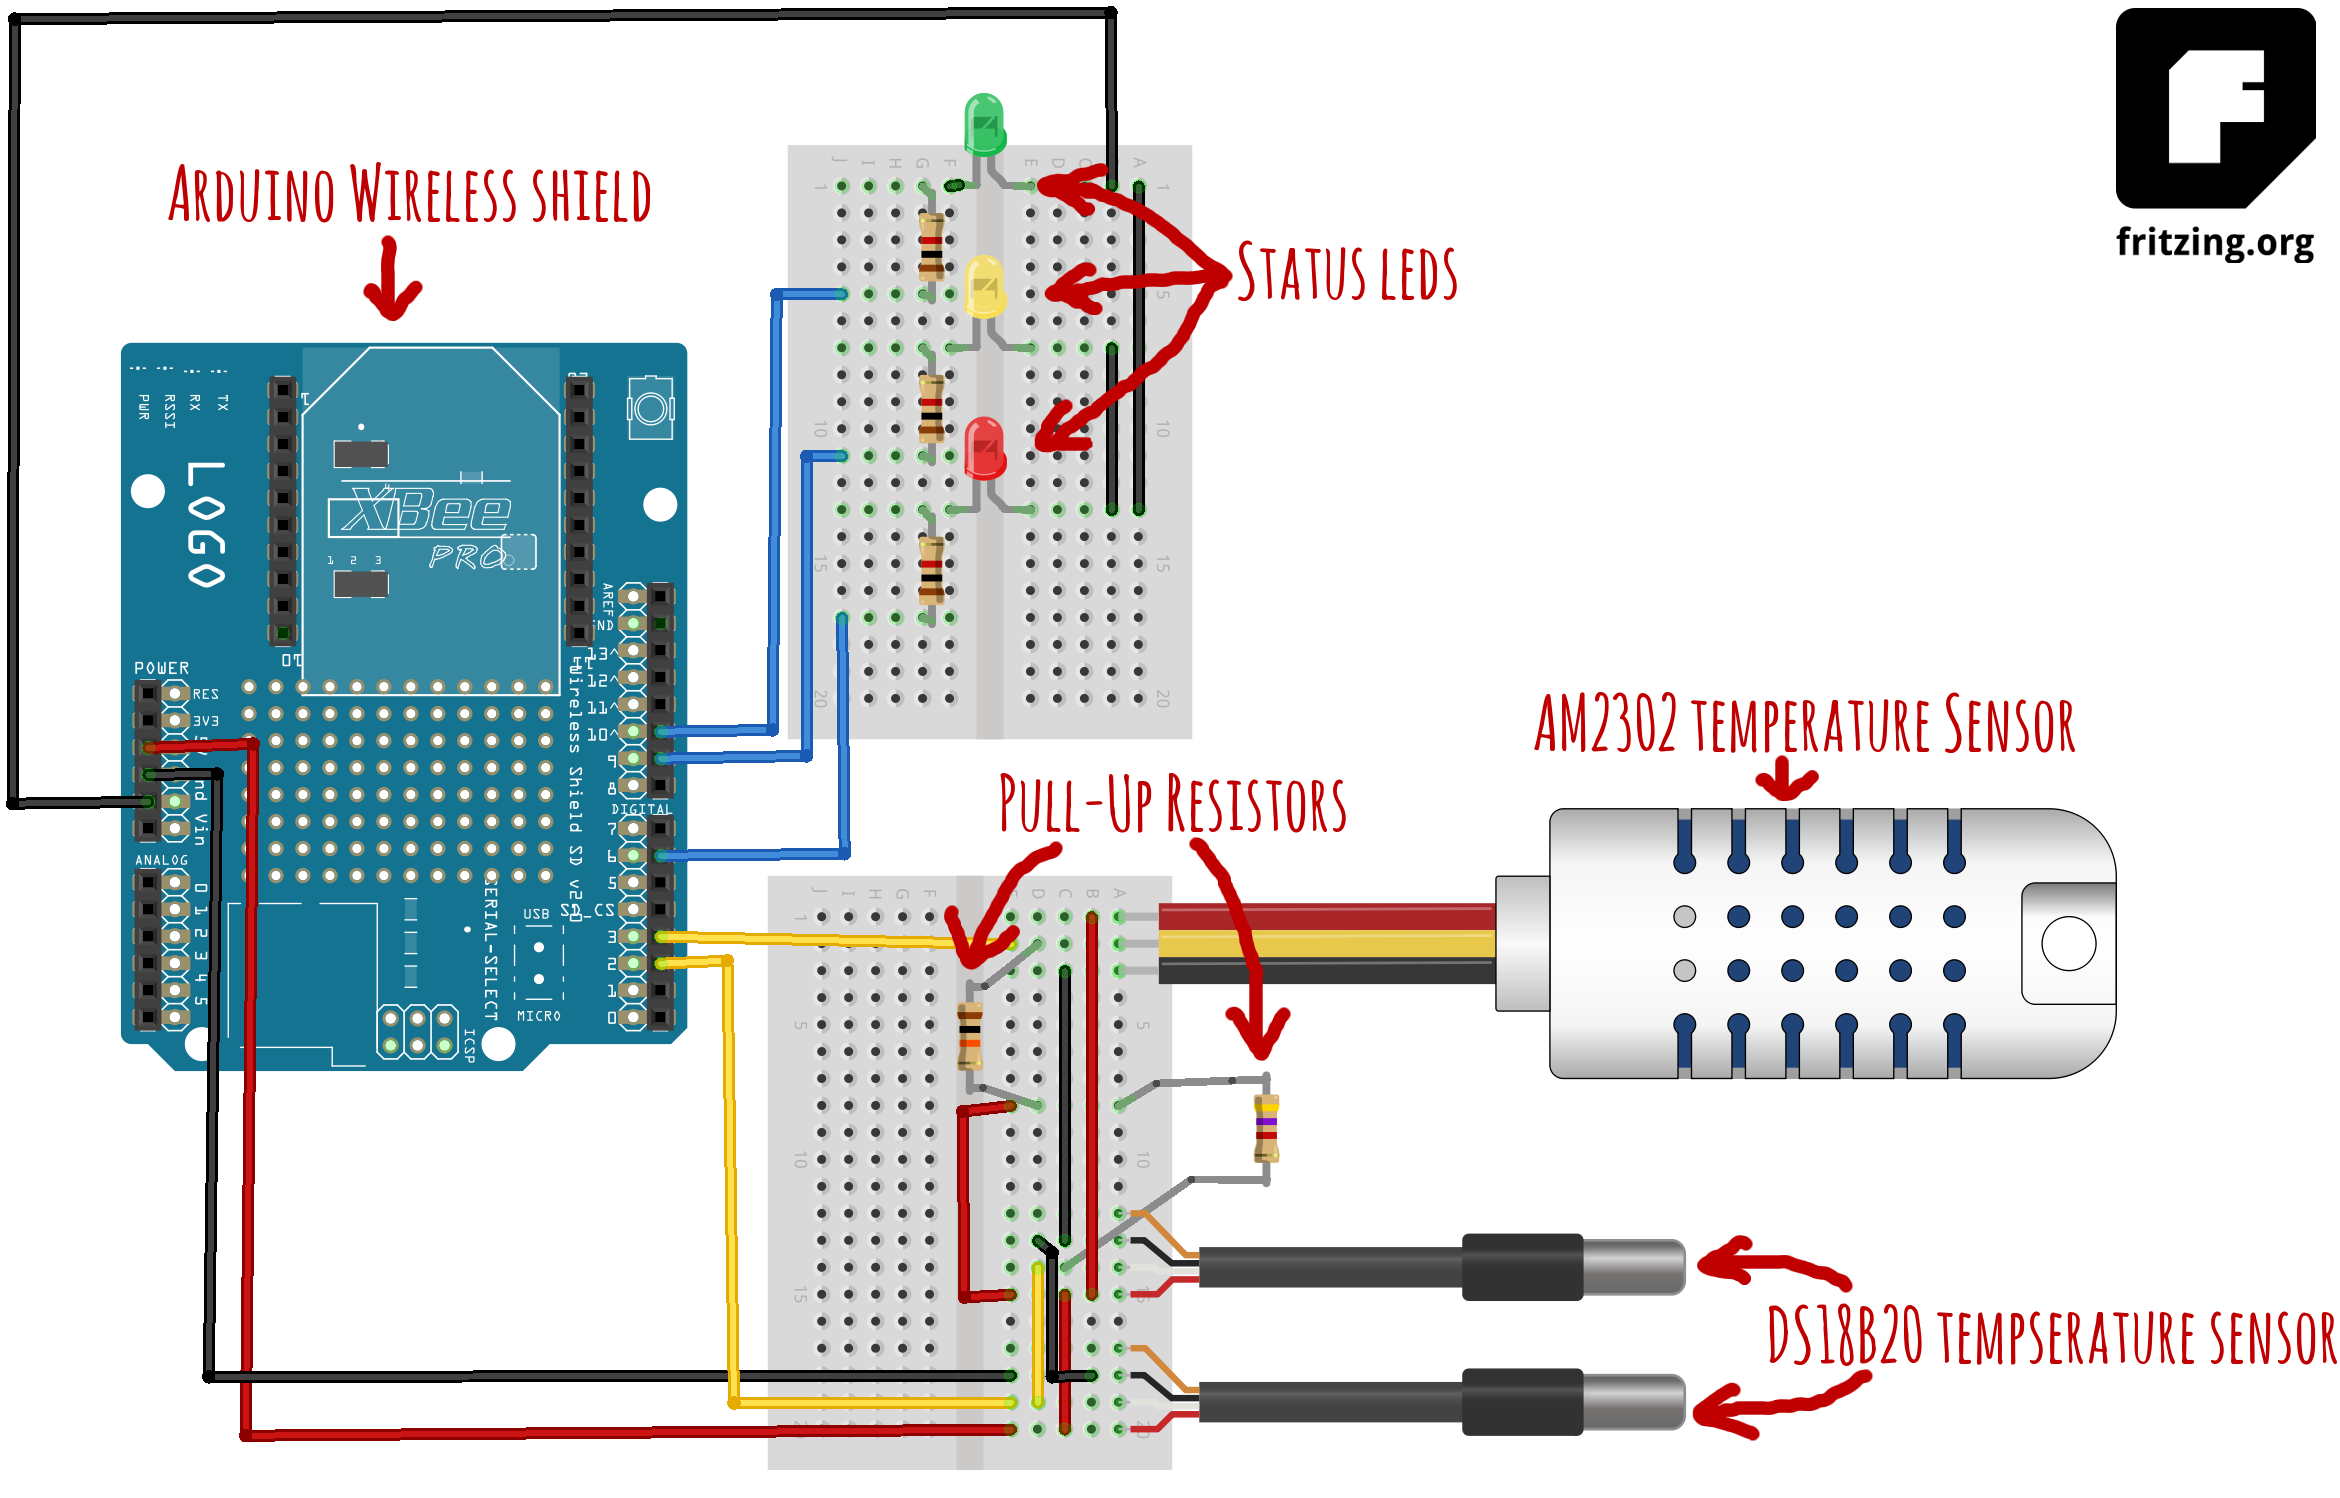
I am now stabilizing my code (still a few glitches…) and in a next post, I’ll describe the hardware connections and associated programs.


New WiFridge based on Adafruit CC3000 Wifi shield

Because I could no get a stable WiFridge (see here, here and here for details on my first version of WiFridge) using RN-XV Wifly module, I decided to give a try to the new Adafruit CC3000 Wifi shield.

By the way, I made a mistake when I ordered the shield (although it is quite clear on Adafruit’s web site…) there are 2 versions :

  • one with uFL connector and then needing an additionnal antenna and adapter wire
  • one with built-in ceramic antenna

So unless you really need an external antenna, the ceramic antenna should be sufficient for most use…

Apart from Wifi module, hardware is quite similar :

  • 2 waterproof DS18B20 temperature sensors
  • 1 AM2302 sensor

Temp Probes

  • 3 3mm LEDs (green, yellow, red)
  • 3 1kΩ resistor
  • 1 10kΩ resistor
  • 1 4.7Ω resistor (AM2302 does NOT need a pullup… it is built-in !)
  • 1 Arduino Wireless shield
  • 1 RN-XV Wifly module
  •  Adafruit CC3000 Wifi shield
  • a bunch of wires

WiFridge CC3000 640x480

Connections are quite straightforward :

  • Led are connected to digital I/Os 3, 6 and 7 through 1kΩ resistors. They are used for operation status.
  • Both DS18B20 are conected to port 8 (yellow wire) and make use of a 4.7kΩ pullup resistor
  • AM2302 is conneted to port 9… no pullup required !

Code for arduino is here.

It has now been running for 1 day with no glitch… and it will hopefully continue !

2014-02-11 23_18_13-Emoncms

WiFridge : hardware details

In this post, I will give the details of the WiFridge hardware : how to connect the probes to the Arduino. It follows the post here.

The hardware

Here is the bill of material :

  • 1 AM2302 Humidity & temperature sensor
  • 2 DS12B20 1-wire waterproof temperature sensor
  • 3 3mm LEDs (green, yellow, red)
  • 3 1kΩ resistor
  • 1 10kΩ resistor
  • 1 4.7Ω resistor
  • 1 Arduino Wireless shield
  • 1 RN-XV Wifly module
  • some solderless breadboard
  • a bunch of wires

Fritzing Wifridge

It is connected as describe on the previous figure (created mostly with Fritzing.)

  • AM2302 : data connected on digital input 3 for kitchen temperature and humidity connected to a 10kΩ pull-up resistor
  • both DS18B20 : data on digital input 2 for fridge and freezer temperature, connected to a 4.7Ω pull-up resistor
  • status leds on digital inputs 6, 9 and 10 (optionnal though, just here for displaying status when operating) through 1kΩ resistors.

The 3 sensors are also connected to ground and +5V through their corresponding wire.

WiFridge Front Final with notes

Also, to simplify debugging, I decided to connect WiFly UART to a software serial port on the Arduino so that the hardware serial is free for programming and debugging. I simply cut off the Rx and Tx legs on the shield and reconnected them to digital pin 7 & 8. But it is possible to only bend the legs so you can revert the process.

Wifridge Rx Tx cutoff 640x487

 That’s it for the hardware. In a coming post, I will describe the software part.

Introduction to one of my first Arduino based project : WiFridge…

… or why one would want its fridge to be connected to the internet !

This is one of my first Arduino based project. I had some issue in the past with my freezer that would let the temperature going to high for too long and I had no way of knowing before it was too late. I could barely detect it happened by using an ice cube in a glass that would melt in case of a huge temperature problem. That is why I decided to build the WiFridge : a wifi device that would monitor my fridge’s and freezer’s temperatures and send an alert in case anything goes wrong.

I first tried using an Arduino Ethernet because it was far less expensive than an arduino with a wifi shield. But… I have no ethernet port near my fridge and I did not want to have an ethernet cable across my kitchen… So I had a look on internet and decided to go for a RN-XV WiFly Module from Roving Networks and the ad-hoc shield.

WiFridge 1000x750

For the temperature part, I bought 2 DS18B20 sensors, in a waterproof package, coming with a 1m long cable and its 4.7k pull-up resistor. I also bought an DHT22/AM2302 temperature and humidity sensor so I can get my kitchen’s environnement data along with fridge’s and freezer’s temperatures. Both sensors are digital sensor. That is, they send the temperature (and humidity for the AM2302) in the form of bits, not an analog voltage. DS18B20 sensor is using 1-wire protocol which I found very nice because I can connect both DS18B20 sensor to the very same input.

Add a few leds for monitoring the status of the gizmo, a bit of soldering after some testing on a breadboard, a few lines of code, and that’s it, I got my WiFridge up and running, sending data to the internet…

In a coming post, I will go into more details, give a detailed schematic for the hardware, describe Arduino’s code that I used (I am still working on it though as I have some Wifi stability problems…) and how I sent data to my emoncms web sites (one local on a Raspberry Pi and one on a shared hosting.)